Navigate to specific articles using the CoursePack Contents panel or jump from one article to the next using the QuickNav.
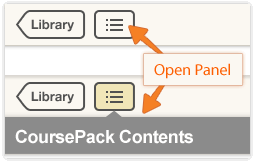 To select a specific article to read, use the CoursePack Contents panel—open the panel using the icon in the top left corner of the Reader screen. Articles are displayed as clickable links that will bring you directly to the beginning of an article.
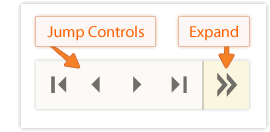 Use the QuickNav in the bottom left corner of the screen to jump from article to article, to the table of contents or the last article. Expand the QuickNav to see the name of the artcile you’re reading.
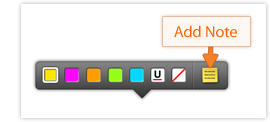
Highlighting is as easy as selecting text—click, drag and release. The highlighting toolbar opens providing the opportunity to change the highlight color or add a note.
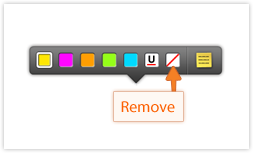 The highlighting toolbar also provides an option for removing highlights. You can remove notes associated with highlights using this option too. In the Settings menu, look for the Highlighting Toolbar Settings... option if you'd prefer the toolbar not to appear every time you highlight text.
 Clicking the notes icon on the toolbar opens the Notes Panel, where you can add and edit notes. Each note appears directly below the highlighted text it relates to. You can add and remove notes and highlights in the Notes Panel as well, using the options that appear when you hover over each item.
After a note is added, a note icon will appear on the page next to the highlighted text—click on the note icon to navigate directly to the note in the notes panel.
Sharing notes and highlights so friends can view them right in the Web Reader, or the XanEdu tablet app, along-side their own notes, makes studying in groups a lot easier. In the Actions panel select Share Notes and Highlights to get started.
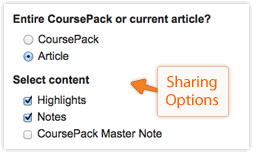 The Share Notes dialogue box offers several options for customizing what you send to recipients. Recipients will be able to import your notes and highlights to view them in the same CoursePack alongside their own.
Importing Shared Notes and Highlights
When notes and highlights are shared from a XanEdu account, an email with a .xanedu file attachment is delivered to the intended recipient. Shared notes and highlights can be imported into either the Web Reader or the XanEdu tablet app. If you're expecting an email with shared notes and highlights and it has not arrived, please be sure to check your email spam folder.
Web App Importing
Tablet App Importing
To import these notes and highlights into the free XanEdu tablet app:
Exporting PDFs of Notes and Highlights
For handy off-line access, you can download compiled PDF files of your notes and highlights directly to your computer. Include article content with your notes and highlights, or not—it's up to you. PDF files can be opened and viewed using Adobe Acrobat.
The Font/Margin Panel provides options for tailoring the reading experience to your own reading style. For easier long-form reading and improved reading comprehension, choose a comfortable text size and wide margins. For quick scanning, you might prefer a smaller text size and narrow margins.
Use the "Print" option in the Actions Panel to print highlights, notes and article content. Using the "Collaborator Material" option, you can print notes shared by your collaborators too. Note to Safari users: For printing, article content is made available separately from highlights and notes.
For easy highlighting and note taking, the Reader has a default highlighting mode. To copy text from a CoursePack, exit highlighting mode by copying or pasting using the browser menu options or keyboard shortcuts, or by selecting the "Copy "option in the highlighting toolbar extension. Once you have finished copying text, press the "Activate Highlight" button to return to highlighting mode.
PDFs and Digital Rights Management
If you encounter difficulty opening or using a digitally rights managed CoursePack with other applications (e.g., Adobe Acrobat), we provide useful tips on our DRM page that may help.
Digital Rights Management (DRM) is an umbrella term for the concepts and supporting technology needed to protect the ownership rights of content. Features that may be limited or restricted in certain DRM circumstances:
The Settings Panel provides options for changing some basic application settings, like how the highlighting toolbar opens each time you make a highlight. The “Highlighting Toolbar Settings…” option allows you to show or hide the toolbar each time you highlight text. You can also select your default highlight color or change the highlight color labels.
The search feature allows you to search for information in the article you are reading. You can enter individual search terms or short phrases. Search results will appear in the Search Panel as clickable links that you can use to navigate to the article content.
Notepad notes are different from the regular notes that are anchored to article content. The notepad is more of a notebook for you to use in a general way that doesn't mark up an article's content.
Selecting an image opens the image viewer window, where you can zoom and pan images that appear in the CoursePack.
Use exhibit and footnote links to navigate directly to related content. And use the browser's back button to return from the exhibit or footnote to your previous location.
If you prefer reading on an iPad, you can access all of your CoursePacks through XanEdu’s free iPad App. Get the XanEdu iPad App!


